
More and more householders are making use of their basements to provide extra accommodation. Rather than trying to keep water out completely in order to keep the area dry, most conversions now rely on a system that allows water to drain down the walls behind the décor and then uses sump pumps to remove the water that accumulates.
Many people will have a builder install the pump as part of a basement conversion, but if you’re doing the work yourself, installing sump pumps isn’t as difficult as you might think.
1. Low points
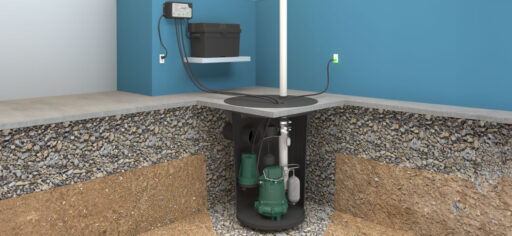
The first thing to do is identify the lowest part of your basement. This is where you’ll need to locate the pump. Excavate a hole deep enough to hold the sump and the pump. The top of the pump generally sits flush with the floor, though various types of sump pumps are available. A layer of gravel in the bottom of the hole gives a firm level base for the sump to sit on.
2. Drainage
Water needs to get into the sump in order for the pump to remove it. Usually, there are channels around the edges of the basement, and water will be piped from these into the sump itself. In some cases, it may also be allowed to ‘weep’ into the sump from the surrounding soil. In the latter case, you need to line the sump cavity with filter fabric to prevent clogging with dirt and debris.
3. Choosing your sump pump
When you choose a pump, you need to ensure that it has sufficient capacity to cope with the volume of water you expect to move – also that it’s powerful enough to be able to lift the water away to your chosen drain point. Note too that some pumps are submersible, whereas with others the motor needs to remain clear of the water.
It’s important to understand the valves on your sump pump. The float valve triggers the pump to operate based on the level of moisture in the reservoir. Make sure that it is unobstructed and able to move freely. There will also be a non-return valve which prevents the water that’s being pumped out from running back into the sump.
4. Piping
The water that the pump removes needs to go somewhere, and this involves piping it out of the basement to a suitable drain. Most systems use plastic piping to take the water out of the basement. Make sure that this is securely fitted and that the joints are properly secure. The pipe needs to run to a drain or gulley outside the house to ensure water is carried away safely. Make sure any places where the pipe passes through walls are properly sealed.
5. Ready to go
With everything connected up, you can test that it all works. Slowly pour water into the sump and check that the float valve operates and the pump starts up. With the pump working, check all of your pipe joints for leaks. Once you’re happy that everything is fine, you can fit the sump cover and seal up around its edges. You’re then ready for anything the weather can throw at you.
Need help choosing the best sump pump for your requirements? We’ve got you covered.